Community

Community; a feeling of fellowship with others, as a result of sharing common attitudes, interests, and goals.

Life sometimes becomes so busy and hard that I have learned to take a step back and let the dust settle when I feel like I am one step too close to the edge. At least that is what has been going on in my world. While most things in my life are extraordinarily amazing, some of it has been equally stressful and emotional. I know that the best thing for me to do is get outside, get my hands dirty, and be productive. Some people freeze under stress and I am the exact opposite. The more I can accomplish in a day when I feel like I am going to explode, the better I feel. Not sure what that coping strategy might fall in the fight/flight/freeze realm, but getting stuff done is where I cope.

Literally a month ago I softly uttered the words —maybe I should open up one of my Fridays to see more students since my schedule is so packed and the demand is so great. Within a week of saying that a huge agency asked if I could add TEN memory care assisted living homes to my already swamped schedule. Sometimes when we speak something vague the universe hears it and runs with it! There is no way I could do ten homes in one day, so I chose to go from zero teaching on Fridays to every Friday teaching in four homes. And, another local agency serving adults with traumatic brain injuries doubled their services with me.

Wow.

Last week was my first week of doubled time locally and full days on Friday. I am going to be honest….by Friday at 3pm I decided that if I had to say “take a breath in and blow out a candle” one more time I was either going to lose my mind or cry.

Complicate my exhaustion of driving over 850 miles in four days, teaching 18 hard classes, and dealing with constant pain, I also needed to step up in the mom arena these last couple weeks. For the record, when a young mom complains of the demands of a toddler I kindly tell them to fasten their seatbelt because being a parent to an adult child is one of the hardest things you’ll ever go through. You have to trust that your wisdom will be heard and accepted–much different than putting them in PJ’s and sending them to bed at 7pm.

I realized today as I was having my productivity ass kicking session of washing both my cars, planting lettuces, spinach and arugula, trimming trees, fixing fountains, coloring my girls hair, finalizing contracted social media work, and cleaning the house, that I am so grateful for the community that I have.

In hard times it’s great to know that I am surrounded by people who care and are interested in becoming their best selves. If you are a reader of this blog you are either here for amazing recipes, or essential oil uses, or maybe you are here for inspiration and hope. Whatever brings you back, I realize that in a huge way this outlet gives me the support I think I need to carry on.

I also realized today that I have done hard things before. Many times. Whether it is raise three kiddos alone, navigating the unknown territory of developmental disabilities, or building a business from nothing, or leaving a loveless and controlling relationship that gave me financial safety and security to venture out with just a truck full of belongings and start all over at age 43.

I have done hard. And I have not only survived, but I have thrived. I know that this too shall pass with my kid and I will find my rhythm in adding a huge amount of demanding work to my schedule.

After all, I am not alone, right? I know that I have thousands of people all over the world whose energy comes to me through platforms like these and that in my hardest days, I can still feel that energy. Community and feeling connected is where we survive hard times. I know that I cannot do this life alone and continue to make a difference in the lives of others. Isn’t that essence of community anyway?

So, thank you. Thank you for carrying me on the tough days and allowing me an outlet to write, cry, laugh, cook, inspire, create and mostly, to love.

Follow me for more goodness!

Beginnings

“What would life be if we had no courage to attempt anything?”

– Vincent Van Gogh

We have all had that initial beginning of something.

That first time taking a fitness class, embarking on a new way of eating, beginning a mediation practice, or as simple as increasing water consumption. Sometimes the first class, or the first recipe, or the first time you sat with awareness is often the hardest.

If you are embarking on a new something consider these 5 tips:

1. Remember it is about the journeyWhile enthusiasm is fabulous, it can be so easy to jump from your starting point with only the end result in mind.  Whether you are looking to lose weight or increase your overall well-being it is imperative to enjoy the steps along the way.  If your only focus in losing those 20 pounds, I guarantee you will miss the joy in planning, shopping, cooking and eating that amazing meal. The tastes you experience are the end result, but the joy that can come from loving what you are creating is the journey.  Enjoy each step.

2.  Stop and breathe. Every single day find 10 minutes to simply breathe.  Inhale. Exhale with intention and awareness.  This practice will keep you grounded as your life changes.  As you embark on a new way of being, people around you will challenge you.  It is imperative that you have this tool in your tool box.  Breathe.

3. Be tender with yourself. Yes, you will stumble.  And you will miss the Yoga class because of work.  Yes, you will eat that cookie the kids leftover.  Yes you will choose soda over water.  It happens.  Start again without a litany of negative self-talk.  Instead remember that the sun does come up tomorrow and you can begin again.

4. Ask yourself those hard questions. As you begin anything new it is key to get into your heart and know what it is that you are seeking. Are you doing this for you or for someone else?  Are you doing it with the hope that you will be happier? Do you have a goal in mind or are you wanting to just explore the experience?  Are you willing to make choices and changes?  What are you willing to do to make those changes?

5. Be open to a mind shift. Do you notice that you have a series of limiting beliefs about yourself or your life? You know, things like “I don’t have enough time or money”, “I am not flexible”, “I can’t sit still long enough to meditate”, “I don’t like the taste of plain water”.  Consider what might happen if you turned those limiting beliefs into statements of hope—“I have the ability to choose where I spend my money”, “I choose to make the time, because I am worth it”, “I honor my body in a Yoga class and not compete”, “I am capable of sitting for 5 minutes today”, “I am grateful to have fresh, clean water to drink”.  Consider shifting to a belief of positivity and hope.

Why? Because YOU are worth it.

Follow me for more goodness!

One Bowl Breakfast Cookies

I admit it. I cannot keep cookies in the house without eating at least one per day. I recently solved my guilt by making some healthy versions of cookies. Since I am also not a big breakfast eater I wanted to try to make something that is healthy and something that I would actually want to eat. And, does anyone ever really eat all the bananas before they go brown??? This recipe is great for those forgotten bananas.

These One Bowl Breakfast Cookies are so quick and easy to make–it’s as simple as mixing together wholesome ingredients in one bowl and baking them into the best morning meal. These nourishing banana oat breakfast cookies are the perfect way to start your day, because cookies taste even better for breakfast! Plus, you can play around with different mix-ins so you will never get bored. Who could get bored with a cookie anyway??? My latest favorite thing to toss in is shredded coconut and my favorite chocolate protein powder …… soooo good. And the protein gives you a little more to keep you feeling full.

INGREDIENTS

  • 2 cup quick oats (I choose gluten free oats)
  •  ½ tsp ground cinnamon
  •  ¼ tsp salt
  •  ½ cup natural creamy peanut butter
  •  ½ tsp vanilla extract
  •  2 large ripe bananas mashed (about 1 ½ cups)
  •  ¼ cup dark chocolate chips

SUBSTITUTIONS AND ADDITIONS

  • Mix-Ins: Feel free to add your favorite mix-ins for extra texture and taste. Some ideas include dried cranberries, raisins, pumpkin seeds, chia seeds, unsweetened shredded coconut, and chopped nuts. 
  • Nut Butter: You can substitute the peanut butter with almond butter or cashew butter. To keep it nut-free, try sunflower seed butter or even smooth tahini can be used. 
  • Something Sweeter: The bananas add natural sweetness to these cookies. However, if you want them sweeter, add 2-4 tablespoons of maple syrup, honey (note that honey is not vegan-friendly), or agave nectar.

LETS MAKE SOME COOKIES

Combine all ingredients in a large bowl and mix until combined. Drop 2 tablespoon scoops onto the baking sheet.
I recommend baking your cookies on a parchment-lined baking sheet to avoid the cookies sticking. Flatten into the shape of a cookie. The cookies will not spread, so they will come out of the oven in the same shape that they go in. You can use a cookie cutter to help form perfect circles or use the bottom of a juice class to smush the dough down. Bake at 350°F for 14-17 minutes, or until the edges begin to brown. Remove from the oven, cool and serve. I like to store these in an airtight container in the refrigerator up to a week (mine never last that long though).

Enjoy!

Follow me for more goodness!

Healthy Shamrock Shake

Here’s a healthy shamrock shake recipe for you to enjoy this St.Patrick’s Day instead the sugary, dyed version from the drive thru. It’s all fun until you actually look at the ingredients and calories. Have you ever looked up the ingredients for McDonald’s shamrock shake? Do a quick Google search. I promise you’ll never want to eat another one again after you see what’s in it.


This version takes the same amount of time to make as it would take you to sit in the drive thru and it is packed with nutrients and the perfect amount of healthy fat and protein.


This lightened up version with the pure Peppermint essential oil will definitely help you feel amazing and might even bring some luck your way!

Here is a homemade version of the Shamrock Shake that tastes great and is so much healthier.

Please be sure to use an essential oil that is safe to consume. Many are not. The bottle will have a supplements facts label on it if it is safe to eat. It’s also not recommended to consume any essential oil you’ve bought from Amazon or other unknown sources. Even if it has a tamper proof cap on it. Many are adulterated a posed to look like the legit thing. Crazy, I know.

Whip this up for some shamrock fun!

Ingredients
• 1 ripe Avocado
• ½ cup milk of choice Almond, Coconut, etc
• ½ cup frozen banana
• 1 scoop active stacks Vanilla protein powder
• ¼ cup ice
• 2 drops Peppermint Essential Oil. Make sure to use one that is labeled safe for consumption. I use doTERRA brand.
• 1 scoop doTERRA Greens. Or use your favorite dried greens. Leave it out if you don’t have it.


Instructions
• Combine all ingredients in your blender and blend well. Add more liquid if necessary.

Amazing and way better for you than the sugar filled green treat! Plus, you might get some extra luck on your side! ?

Follow me for more goodness!

Lemon Essential Oil Uses

Spring Cleaning is here! I love this month to de-clutter and deep clean.

If you’ve been feeling the itch to get some spring cleaning done, you may notice some areas of your home have been neglected for far too long.

Luckily, doTERRA Lemon oil ?can help make cleaning those long-forgotten nooks and crannies easier. Here are 10 ways you can use Lemon to clean your home.

?1. Microwave—Microwaves are notorious for being tough to clean, especially after mishaps involving spaghetti sauce or tomato soup. To ease the pain of cleaning, simply microwave a cup filled with water and a few drops of Lemon, then wipe clean!

?2. Dishwasher—Pour distilled vinegar into a dish and add 5–10 drops of Lemon oil. Place this dish in your empty dishwasher and run on high.

?3. Stove Top—Lemon oil makes cleaning one of the dirtiest areas of the kitchen easy. Add vinegar and Lemon to a spray bottle, and watch the grime disappear!

?4. Appliances—From dust to greasy food spills, appliances collect more dirt than you might think. A simple solution of Lemon oil, water, and vinegar will help you clean toasters, refrigerators, mixers, and more.

?5. Garbage disposal—If you’ve been smelling something funky coming from your sink, it might be time to clean the garbage disposal. A simple DIY disposal recipes listed below.

?6. Ceiling Fan—Fan blades collect dust at turbo speeds and cling to them for as long as you let them. To avoid choking on dust bunnies while cleaning your ceiling fans, spray the inside of an old pillow case with a Lemon/water mixture and loop the fabric around each blade.

? 7. Washing Machine—Run a mixture of Lemon oil, baking soda, vinegar, and water through your empty machine on the hottest setting to break up dirt build-up and mildew. Scrub any excess with a sponge, then run the machine again with fresh water.

?8. Trash Cans—Regularly cleaning out trash cans can eliminate odor. For indoor trash cans, spray the inside and outside of each can with a mixture of water, Lemon oil, and vinegar, then scrub with a sponge.

?9. Windows and Windowsills—The same mixture of Lemon oil, water, and vinegar in a spray bottle that you’ve been using all around the house will do wonders for your windows and windowsills. Simply spray glass and wipe with a clean cloth or paper towel, then move onto ledges and sills with a toothbrush or damp sponge.

?10. Air Vents—One of the most overlooked areas to keep clean in your home is the air you breathe! Clean vents with a sponge dipped in warm water, vinegar and Lemon oil to help eliminate allergens and dust from filling the air around you.

?Lemon oil acts as a powerful cleaning agent and the possibilities are truly endless! Share this post and let us know how you like to clean with Lemon oil.

Garbage Disposal Refreshers

With everything that goes into the disposal, odds are that odors could be accumulating in there. Try this simple DIY recipe to make your own garbage disposal refreshers that will help freshen, clean, and deodorize your garbage disposal.


Ingredients

2 cups baking soda
1 cup salt
½ cup water
? cup unscented liquid castile soap
30 drops lemon essential oil

Note: Liquid castile soap is a vegetable-based soap commonly found in health food stores.


Instructions

  1. Combine baking soda and salt into bowl.
  2. Add castile soap and essential oil into mixture.
  3. Add water, one tablespoon at a time, while stirring with hands until it forms into the consistency of “damp sand”. It should stay together when you press it together. If you add too much water just add some more baking soda and salt until the consistency is right.
  4. Grab a tablespoon measurement device and scoop packed spoonfuls onto parchment paper.
  5. Once the mixture has been scooped, let dry for 24 hours or until they are hard. One batch should make about 36 garbage disposal refreshers.
  6. Put into glass jar and use the next time you do dishes. Just put 1–3 refreshers into the garbage disposal and turn it on. You will immediately smell the refreshing scent of Lemon essential oil.

So easy, eh? I store mine in a cute jar…these also make great toilet bowl cleaning tabs! So versatile!

Follow me for more goodness!

Red Velvet Cake Balls

While I love a good ol’ classic cake I decided to try my hand at making red velvet cake into bite-sized treats for Valentines Day! An added punch of Wild Orange essential oil gives these an extra decadent flavor. If you have never added essential oils to food you’re missing out! Check out this free ebook download that explains many ways to use essential oils, including in food! Be sure to always check that your oils are tested for purity, though!

Okay, back to decadent chocolate goodness! These are so pretty and taste amazing!

How to Make Red Velvet Cake Balls

This tasty creation is made out of red velvet cake that is bonded together with homemade cream cheese frosting and coated in white chocolate. For an extra decadent finish, white chocolate and dusted the top with sprinkles for a stunning polish.

Make sure to add sprinkles before the chocolate dries to ensure that they firmly stick. We chose red and white for a color theme, but you could use sprinkles and sanding sugars in any array of colors to match a party theme, team uniforms, or holiday.

Ingredients

  • 1 (15.25-oz.) pkg. red velvet cake mix
  • 1 cup whole milk
  • ? cup (2 2/3 oz.) salted butter, melted
  • 3 teaspoons vanilla extract, divided
  • Nonstick spray
  • 1 (8-oz.) pkg. cream cheese, softened
  • ½ cup (4 oz.) salted butter, softened
  • 4 cups (about 16 oz.) powdered sugar
  • 3 (10-oz.) pkg. white chocolate chips
  • 2 drops wild orange essential oil
  • Red and white sprinkles and sanding sugars

Directions

  1. Preheat oven to 350°F. Beat cake mix, milk, melted butter, and 1 teaspoon of the vanilla in bowl of a heavy-duty stand mixer fitted with paddle attachment on low speed until well blended, about 1 minute. Increase speed to medium, and beat 2 minutes. Pour batter into 13- x 9-inch baking pan that has been sprayed.
  2. Bake in preheated oven until a wooden pick inserted in center comes out clean, 24 to 28 minutes. Cool in pan on a wire rack 15 minutes. Turn cake out onto wire rack, and let cool completely, about 2 hours.
  3. Meanwhile, beat cream cheese and softened butter with heavy-duty stand mixer fitted paddle attachment on medium speed until creamy. Reduce speed to low, and gradually add powdered sugar and remaining 2 teaspoons vanilla, beating until blended. Increase speed to medium-high, and beat until fluffy, 1 to 2 minutes.
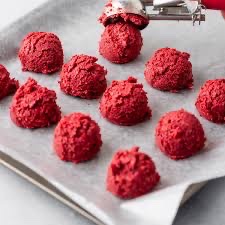
  4. Crumble cooled cake into a large bowl. Stir in 2 cups of cream cheese frosting. (Reserve any remaining frosting for another use.) Roll cake mixture into 48 balls, about 1-inch in diameter. Place balls on baking sheets, and cover with plastic wrap. Chill 8 hours or overnight.
  5. Melt 1 package of the white chocolate chips in a medium-size microwavable bowl in microwave according to package directions. Stir in two drops of wild orange essential oil. Start with 16 cake balls (continue to chill remaining 32 cake balls). Using a fork and working with 1 cake ball at a time, dip ball into melted wafers, allowing excess to drip back into bowl. Place ball on a parchment paper-lined baking sheet, and immediately sprinkle with desired amount of sprinkles or sanding sugars. Repeat with remaining 15 cake balls and melted wafers in bowl, cleaning fork between each dip. Wipe bowl clean, and repeat 2 more times with remaining chilled cake balls and 2 packages of melting wafers, and desired amount of sprinkles. Chill until ready to serve.

Follow me for more goodness!

Mindful Gluten-Free Muffins

I’m on a mission to eat a little more mindfully. I tend to get myself distracted by things to be done or things I want to do, and eating is low on that list. I made these muffins yesterday which is some thing I used to do all the time. Some how my life priorities became shifted but I am realizing that I need to move the lends back to eating better. For years I was a big time foodie and creating amazing meals was my jam, but then that season ended and I busied myself with other interest. Thing is though, I miss eating good food! I tend to grab something fast at the deli and move on to the next thing with little thought about nutrition.

As I am mentally and physically preparing for my fourth hip surgery in just two months I know I need to bump up the nutrients and get my body in prime condition for recovery. These little muffins are my first step at walking back towards a more mindful eating pattern.

They’re super easy, super healthy, and delicious.

As you may recall, I’m not the best at exact measurements as I tend to eyeball everything.

Here’s how I did it.

Mindful Gluten Free Muffins

•2 ripe bananas

•2 eggs

•splash of MCT oil

•2 scoops of active stacks protein powder

•1/4 cup ish of melted coconut oil

•1 cup ish of almond flour

•1/2 cup ish coconut flour

•1 tsp baking powder

•1 tsp baking soda

•Pinch of salt

• dash of cinnamon

Bake 350 for 25 minutes. I store mine in the refrigerator to enjoy all week.

Follow me for more goodness!

Autumn Pumpkin Soup

Are you tired of all the pumpkin recipes yet? It seems everywhere you look someone has yet another pumpkin recipe. But this one cannot be overlooked! It’s so good and so easy! It’s nutty, spicy, delicious and good for you!

Ingredients:
  • 1 pie pumpkin
  • 1/2 cup diced red onion
  • 1 tablespoon coconut oil
  • 1 jar roasted red pepper
  • 1 1/2 cups chicken broth
  • 1/2 coconut milk
  • 1 cup cashew butter
  • 1/2 tsp tumeric
  • 1/2 tsp black pepper
  • 1 tsp paprika
  • 2 garlic cloves or 2 tablespoons minced

To make this soup you’ll need to roast a small pie pumpkin. I like to cut it in half, scoop out the seeds, add salt and pepper and pop in the oven at 350 degrees for about an hour. I like o save the seeds and roast them for garnishes or quick snacks. You can also do this the easy way and use canned pumpkin but there is something so soulful about roasting one.

Meanwhile in a large pot sauté the onions in the coconut oil until tender. When the pumpkin is fully cooked and soft, allow it to cool enough to handle and then scoop out that delicious flesh. Add the pumpkin and the rest of the ingredients to the pot.

Let this simmer for at least 30 minutes. I actually love the smell and allow it to simmer sometimes for an hour or more, stirring for often.

Using an immersion hand blender, blend until velvety smooth. You can also add to a large blender but be mindful hot liquids and some blenders don’t like each other.

You can top this soup with roasted pumpkin seeds or not!

Enjoy!

Easy Baked Apples

This is everything that is fall! Warmth, coziness, spices and everything apple.

This super simple recipe can be done in an air fryer or a traditional oven — the oven is my personal favorite because the entire house smells like all the amazing fall smells we all love.

Here is what you’ll need:

  • 2 medium size apples
  • 1/2 cup oats
  • 1/4 cup pecans
  • 2 tablespoons melted coconut oil
  • 2 tablespoons coconut sugar
  • 1/2 tsp ground cinnamon
  • 3 drops cinnamon bark essential oil

Here is how you’ll make them:

  1. Combine all the filling ingredients in a bowl
  2. Slice apples in half and core
  3. Sprinkle ground cinnamon on apple halves
  4. Evenly divided the filling between the four apple halves
  5. Bake at 350 degrees for 35-40 minutes or air then at 350 for 13-15 minutes
  6. Top with extra cinnamon and drizzled honey for an added punch

Remember to only use essential oils that are certified pure. One way to tell if they are pure is your bottle will have a supplement facts on the side. If it doesn’t, I wouldn’t recommend taking internally because it is likely not pure and therefore not safe.

Curious the brand I love and trust along with hospitals across the country? Plus they are making a global impact on reducing poverty and building lives for villages and farmers.

Follow me for more goodness!

Summertime Drinks

On those hot summer days, when hunger gives way to thirst, there’s nothing that tastes better than a refreshing drink. Smoothies and lemonades are a great way to quench your thirst, plus they help to incorporate more fruits into your diet! Adding a few drops of essential oil will bring an extra twist to the flavour. Here are some simple and tasty ideas to juice up your family’s summer!

Lemon Berry Smoothie

A great start to the day and the perfect breakfast on the go. Berries have countless anti-oxidant properties — plus nutrients and fibre — which help protect your body against seasonal threats.

Ingredients 

  • 1 cup (230ml) of plain yogurt
  • 3/4 cup (130g) of frozen mixed berries
  • 2 drops of Lemon essential oil

Instructions 

  1. Add all the ingredients into a blender and blend on high speed until all ingredients are well combined and smooth.
  2. Serve immediately.

Honey Ginger Lemonade

A twist on classic lemonade, Honey Ginger lemonade is the perfect refreshing drink to help lift your mood. The juiced ginger helps add a little spicy kick, while both lemon juice and Lemon oil keep the recipe light and cool.

Ingredients

  • 1–2 tablespoons of ginger juice
  • 3 lemons, juiced
  • 3–5 drops of Lemon essential oil
  • 1 cup (230ml) of water
  • 3 tablespoons of raw honey
  • 1 cup of ice

Instructions

  1. Combine all ingredients, except the ice, into a jug. Mix well.
  2. Chill in the fridge until ready to serve.
  3. Serve with some ice cubes.

Raspberry “Lime-onade”

If you are having friends over, then surprise them with a very bright pink “lime-onade”. With only three ingredients, this combination of raspberries and lime is definitely a crowd pleaser. 

Ingredients

  • 2 cups (250g) of raspberries
  • 3 cups (720ml) of water
  • 1 drop of Lime essential oil
  • Juice of one lime
  • 1 cup of ice
  • 3 tablespoons of raw honey

Instructions 

  1. Add the raspberries to a blender, and blend until smooth.
  2. Press through a fine strainer into a jug, and discard the seeds and pulp.
    (TIP: You can also put the seeds and pulp in a small jar, cover with vinegar—like white wine or rice wine vinegar—and store mixture in the fridge. Strain later for salad dressings or for marinades).
  3. Add the lime juice, essential oil and water. Stir to combine.
  4. Stir in the honey until combined.
  5. Pour into glasses, and top with ice cubes. Serve and enjoy!

Tropical Smoothie with Tangerine Essential Oil

This tropical smoothie is just like a dessert (a healthy one!) that will make you forget your sweet cravings. Omega-3, fibre and potassium are just a few of the benefits you will pour in your glass. 

Ingredients 

  • 1 cup (230ml) of organic coconut milk
  • 4 tbsp Greek yogurt
  • 1 banana
  • 1 tbsp of ground flaxseed, sunflower and pumpkin seed
  • 120g of frozen mango chunks
  • 1 drop of Tangerine or essential oil
  • 1 passion fruit, to finish

Instructions

  1. Combine all ingredients into a blender and blend until smooth.
  2. Pour into two glasses.
  3. Cut the passion fruit in half and scrape the seeds on top.
  4. Serve immediately.

Follow me for more goodness! Also check out this gorgeous ebook to learn the basics of essential oils!

Frozen Yogurt & Berry Bark

Summer time is in full swing and not only is it hot out there, but all the great berries and produce are in full abundance! It’s so fun to eat fresh, sweet and amazing fruits and veggies.

I love summer, but the heat is not my friend. I get easily cranky on hot days and am always looking for a healthy way to cool down. This little snack is a go to for me…I can swipe a piece mid afternoon or as a dessert and not feel guilty at all.

It’s simple to make and tastes amazing. You’ll see I add a few drops of lemon essential oil. Be sure the brand you choose to use in recipes is safe to ingest. Most aren’t and you have to be safe. The lemon oil gives a pop of summertime flavor but is also has amazing health benefits. Peek at this gorgeous ebook to learn more.

HERE IS WHAT YOU’LL NEED:

• Yogurt: Use a full fat yogurt for the best texture and flavor. Vanilla yogurt is a great base to use, but you can use any flavor you like.

• Fruit: Fresh strawberries and blueberries add a great pop of color and it’s a tasty way to get some fruit into your family’s diet. You can make this bark with other fresh fruits like mango, raspberries or kiwi fruit.

HOW TO MAKE YOGURT BARK


1. Before you spread the yogurt evenly over a lined baking sheet, add two drops of lemon essential oil and stir.
2. Top with chopped strawberries.
3. Top with blueberries or any other fruits. I love kiwi!
4. Option to finish with granola and freeze until firm. I usually skip the granola but it does give it a great crunch.
5. Once it is fully frozen, slam on counter and remove pieces. You can also cut into bark shapes if it doesn’t make its own by slamming it. I store in a Tupperware up to three months, but it also never lasts that long.

TIPS FOR MAKING FROZEN BARK


1. Use full fat yogurt. Using yogurt with full fat means that the texture will less likely get icy when frozen. It will also have a better taste that’s more creamy. I have used Greek Style Coconut milk yogurt too and it’s fabulous for the dairy free people.
2. Chop everything small. Small fruits like blueberries work very well here and chopping larger fruits to be about the size of blueberries helps with cutting the bark. Make sure the fruits are not too bulky either so the bark looks flat.
3. Line your baking sheet. This will help to remove the bark easily from the tray, if you don’t line it, the yogurt will freeze to it and it will be really tough to remove. Use parchment or wax paper to line the entire surface of your sheet pan.
4. Allow time for the bark to set. It will take around 3 hours for the bark to fully set in the freezer. Make it the night before to enjoy the next day.

Enjoy!

Follow me for more goodness for the mind, body and spirit.

Easy and Fun Chokecherry Jelly

Ever since I started gardening a few years ago I have gotten a huge thrill out of watching something grow from a tiny seeds into something that sustains me. Nothing beats fresh produce right out of your own garden. I love the constant growth and it is such a good reminder to me of having patience, providing loving presence and attention to something and enjoying the abundance that always comes.

Trying new things has always been one of my strengths. I rarely shy away from learning new skills and when it comes to trying FUN new things, I am all in. I have two really large chokecherry bushes along my back fence and for the last three or four years I have muttered to myself that I should try making chokecherry jelly. Somehow each year that thought remained just a thought.

Until this year. Last night I grabbed a bowl and off I went to pick. A great memory I have is my sweet grandmother talking about making chokecherry jelly. While I was picking I felt her spirit as my hands got sticky and red. I had no idea how many cherries I needed to pick to get enough for jelly, but I kept picking. I ended up picking three pint size mason jars and told myself that if it was easy and fun to make jelly, I can always pick more.

Making the jelly was easy and fun. So much so that as soon as my batch was cooling, I took off with a bigger bowl to pick more!

The first thing you do is make the juice. After rinsing and discarding leaves and big stems (don’t worry about the little ones attached to the cherries) cover your cherries with water and boil for 30-35 minutes. You can use this right away for the jelly, or you can freeze it for later. To make the jelly, just follow this simple recipe!

Chokecherry Jelly

Ingredients:

  • 3.5 cups chokecherry juice
  • 1/2 cup fresh lemon juice
  • 1 teaspoon butter or margarine
  • 1 pkg dry pectin 1.75 oz
  • 4 1/2 cups of sugar
  • Optional—I added two drops of wild orange essential oil! Bam!

Instructions:

  1. Pour juices in kettle.
  2. Add pectin, stir.
  3. Bring to a boil, add sugar.
  4. Boil and stir for 2 minutes.
  5. Remove from heat, skim.
  6. Ladle into jars leaving 1/2 inch space. Add the top and the ring, twist just finger tight (not super tight).
  7. Process in hot water bath for 10 minutes. A hot water bath is when you add filled jars to pot of simmering water that covers the jars.
  8. Remove from bath and cool undisturbed for 24 hours.

Besides being fun and easy it is also gorgeous to look at! I cannot wait for a little toast and jelly with my coffee while sitting on the patio tomorrow morning. There is something SO satisfying about making your own food…and even more fun actually picking the ingredients to feed your people. Plus, how amazing will these little jars be for neighbor gifts come holiday time?

** update to original post. After making this two years in a row, I have some measurements that may help. You’ll need approximately 10 cups of berries to yield 4 cups juice. This recipe that calls for 3.5 cups juice yields 7 jars of jelly.

You can find some of my favorite DIY supplies and follow me for more inspiration below!