DIY Rose-Infused Body Butter: A Luxurious Treat for Your Skin
There is something timeless about roses. Their delicate fragrance, soothing properties, and rich symbolism have made them a favorite botanical for centuries. This homemade Rose-Infused Body Butter captures the beauty of the garden in a rich moisturizer that nourishes dry skin while providing a naturally elegant floral scent.
Made with rose-infused oil, shea butter, beeswax, rosehip seed oil, and rose essential oil, this simple recipe creates a silky body butter that is perfect for everyday use or as a thoughtful handmade gift.
Why You’ll Love This Recipe
Deeply moisturizes dry skin
Softens rough elbows, knees, and hands
Rich in vitamins and antioxidants
Naturally scented with real roses
Free of synthetic fragrances and preservatives
Benefits of the Ingredients
Rose-Infused Oil
Rose petals have been treasured for generations for their gentle, soothing qualities. Infusing them into a carrier oil captures many of their beneficial plant compounds while creating a beautifully fragrant foundation for natural skincare.
Shea Butter
Shea butter is rich in vitamins A and E and deeply nourishes the skin while helping lock in moisture. It is especially beneficial for dry, mature, or weather-exposed skin.
Beeswax
Beeswax forms a breathable barrier that helps protect the skin and seal in moisture without clogging pores. It also gives the body butter its smooth, luxurious texture.
Rosehip Seed Oil
Rosehip seed oil is packed with essential fatty acids and vitamins that help nourish the skin, support elasticity, and leave it feeling soft and radiant.
Rose Essential Oil
Just a few drops provide a beautiful floral aroma while complementing the skin-loving benefits of the other ingredients.
Rose-Infused Body Butter Recipe
Ingredients
½ cup strained rose-infused oil
½ cup shea butter
2 tablespoons beeswax pellets
2 tablespoons rosehip seed oil
10–15 drops rose essential oil
Directions
Fill a small saucepan with a few inches of water and bring it to a gentle simmer.
Place the rose-infused oil, shea butter, and beeswax into a heat-safe mason jar.
Set the jar into the simmering water to create a simple double boiler.
Stir occasionally until the beeswax and shea butter have completely melted.
Remove the jar from the heat and allow the mixture to cool slightly.
Stir in the rosehip seed oil and rose essential oil.
Refrigerate or allow the mixture to cool until it becomes mostly solid but is still soft enough to whip.
Using a hand mixer, whip the mixture for 3–5 minutes until it becomes light and fluffy.
Spoon the finished body butter into clean glass jars with tight-fitting lids.
Storage
Store in a cool, dry place away from direct sunlight. Since this recipe contains no water, it can typically be stored for 6 to 12 months. Always use clean, dry hands or a cosmetic spatula when removing the body butter from the jar.
A Simple Self-Care Ritual
After bathing or before bedtime, warm a small amount between your hands and massage it into your skin using slow, mindful strokes. Allow the soft scent of rose to remind you to pause, breathe, and care for yourself with the same compassion you offer others.
Final Thoughts
Making your own botanical body butter is a wonderful way to connect with the healing gifts of the garden. Whether you’re using roses you’ve grown yourself or petals you’ve carefully dried, each jar becomes a reminder that simple, natural ingredients can create something truly beautiful.
If you make this recipe, I’d love to hear how it turned out. Share your experience in the comments or tag @embracingspirityoga on social media. I have a few jars of these left if you’d rather skip making it yourself! Order here!
Enjoying this content? My book 52 Weeks of Wisdom & Wellness goes deeper — find it here.
There is something deeply comforting about creating your own skincare — a slow ritual, a small act of devotion, a way of tending not only to your skin but to your spirit. When I make my homemade body butter, geranium is the ingredient I come back to again and again. Its aroma is soft but powerful, floral but grounding, and it carries an emotional wisdom that feels almost ancient.
Geranium teaches balance — the gentle kind that whispers rather than shouts. It’s one of those botanicals that nurtures both the outer and the inner layers of our lives.
The Emotional Magic of Geranium
Geranium has the unique ability to soften what feels tight or tangled within us. Its scent is known for supporting emotional equilibrium, calming the nervous system, and lifting the weight we sometimes carry in our chest. On days when the world feels heavy or the stress sits close to the surface, geranium has a way of helping us return to center.
A Heart-Centered Botanical
Traditionally connected to the heart chakra, geranium invites compassion — both for ourselves and for those around us. It reminds us to breathe deeper, to lean toward gentleness, and to remember that nurturing is not a luxury but a necessity. When blended into a rich, creamy body butter, it becomes a daily moment of reconnection.
Skin-Loving Benefits
Geranium is as generous to the skin as it is to the soul. It’s often used to help improve skin tone, reduce visible redness, support balance in dry or stressed skin, and encourage a natural glow. Its gentle astringent and restorative properties make it ideal for mature, sensitive, or easily irritated skin.
A Ritual of Slowness
Making your own body butter is a beautiful way to slow down. Melting, blending, pouring — each step becomes a meditation. When you choose ingredients intentionally, especially botanicals like geranium, you’re creating more than a skincare product. You’re creating a ritual. A pause. A way back to yourself.
If you’ve been craving softness, groundedness, or a deeper sense of self-care, that little pink flower may be exactly the companion you need. And your skin will thank you, too.
Homemade Geranium Body Butter Recipe
Ingredients
1 cup shea butter (raw or refined)
1cup *geranium-infused fractionated coconut oil
6 tablespoons beeswax
15–20 drops geranium essential oil
Optional:
5 drops lavender (for relaxation)
5 drops frankincense (for skin rejuvenation)
A tiny pinch of rose clay for a hint of color
Vitamin E (5–10 drops) as a natural preservative
*To infuse geraniums: take spent blooms and allow to completely dry. Once dry, place the mixture in a quart-size mason jar and cover it with fractionated coconut oil. Let it sit for 2-3 weeks before straining and using in a recipe.
Instructions
Melt the shea butter, beeswax and coconut oil in jar with lid in a pot of simmering water.
Remove from heat.
Pour into a glass bowl. Let it sit on the counter or in the refrigerator until it begins to harden.
Add essential oils. Stir in geranium and any optional additions.
Whip until fluffy. Use a hand mixer or stand mixer to whip the mixture until it becomes light, creamy, and buttery. This can take 3–5 minutes.
Spoon into jars. Store in a clean glass jar with a tight lid. Keep away from direct sunlight and heat.
How to Use
Massage a small amount into damp skin after a bath or shower for the softest, most nourished glow. Perfect for dry legs, elbows, arms, and as a pre-bedtime ritual to calm the mind and support emotional balance.
Calm your body and soothe sore muscles with this simple homemade balm
If you’ve ever dealt with restless nights, muscle tension, or stress, magnesium may be your new best friend. Magnesium plays a key role in hundreds of bodily functions, including sleep support, nervous system regulation, and muscle recovery. And while you can get magnesium through food or supplements, applying it topically through a balm allows for direct absorption—and some seriously relaxing benefits.
Today I’m sharing a super easy recipe for a DIY Magnesium Balm that you can rub on your feet, shoulders, neck, or any sore muscles before bed. This recipe fills six 2oz jars and makes a lovely gift or addition to your nightly routine.
Why Magnesium Balm?
Unlike oral supplements, topical magnesium bypasses the digestive system and is absorbed through the skin. Many people find it helpful for:
• Easing muscle cramps and soreness
• Promoting restful sleep
• Soothing anxiety and stress
• Supporting hormonal balance
Step 1: Make Your Own Magnesium Oil
Magnesium “oil” isn’t actually an oil—it’s a highly concentrated solution of magnesium chloride flakes and water that feels slippery like oil when applied.
You’ll need:
• 1/2 cup magnesium chloride flakes
• 1/2 cup distilled water
• Small saucepan
• Glass bowl or jar for storing
Instructions:
1. Boil the distilled water, then pour it over the magnesium flakes in a glass bowl.
2. Stir until completely dissolved.
3. Let cool, then transfer to a clean glass jar or spray bottle.
4. Set aside 6 tablespoons for the balm recipe below.
DIY Magnesium Balm Recipe (Fills 6 2oz Jars)
Ingredients:
• 6 tablespoons magnesium oil (from recipe above)
• 1/2 cup unrefined coconut oil
• 1/2 cup shea butter
• 1/4 cup beeswax pellets
• Optional: 15–20 drops of essential oils (lavender, Roman chamomile, and cedarwood are great for relaxation)
Instructions:
1. In a double boiler or heat-safe bowl over a pot of simmering water, melt the coconut oil, shea butter, and beeswax together until fully liquid. I also use a mason jar and just stick it in the simmering water with the lid on.
2. Remove from heat and allow to cool slightly (just a few minutes so it’s not too hot to touch).
3. Slowly whisk in the magnesium oil. It may separate at first—just keep whisking until it starts to emulsify.
4. Add your essential oils and stir well. I love lavender and cedarwood.
5. Pour into six 2oz glass jars and let them cool completely. They’ll firm up as they cool.
6. Label your jars and store in a cool, dry place.
How to Use Your Magnesium Balm
• Rub a small amount onto your feet, legs, shoulders, or back before bed.
• Apply after a workout to tired muscles.
• Massage into the neck and temples when feeling stressed or anxious.
Note: A slight tingling sensation is normal when first using magnesium topically. If you have sensitive skin, test a small area first or reduce the amount of magnesium oil.
Final Thoughts
This balm is a beautiful addition to your self-care routine. You’ll love how nourishing it feels, and the calming effects might just help you drift into dreamland a little easier. Plus, knowing you made it yourself makes it even more special.
Have you tried magnesium topically before? Let me know in the comments or share your favorite sleepytime rituals!
If you love my content and want more tools for mindfulness & movement, check out my digital products on Buy Me a Coffee! Your support helps me continue creating.
Giving a gift from a small business is giving a gift twice. – Anonymous
It is such a special treat to receive a handmade gift and I am thrilled to have put together a variety of my favorites things to make and use. Also, two of my most popular yoga and wellness offerings are also listed. If you would rather give a gift certificate and allow the recipient of your generosity to choose what he/she would like, please just reach out to me. I cannot wait for your loved ones to get some of these unique items.
Gratitude Essential Oil Blend
$22
This perfectly crafted blend is my most popular mingling of aroma and gemstones. This wonderful scent will instantly shift your mood towards a place of abundance and gratitude. Apply to the wrists, behind the ears and on the heart.
Siberian fir helps in breaking negative emotional and spiritual patterns
Frankincense raises awareness and helps to shine your bright light
Grapefruit teaches us to appreciate who we are
Wild Orange brings abundance, a bright future and gladness to the heart
Geranium is heart opening and helps one to feel security in what you do have
Clove instills personal power and a sense of protection and integrity
Amber chips are a fossilized tree resin. Amber radiates laughter, vitality, and courage. This stone holds the protective energy of our beloved trees, the guardians of Earth. Amber helps to alleviate stress. Amber clears depression, stimulates the intellect and promotes self-confidence and creative self-expression. It encourages decision-making, spontaneity and brings wisdom, balance and patience.
Aromatherapy Bath Salts
$7
These gorgeous tubes make great stocking stuffers, teacher gifts or special offerings for loved ones. Each tube is filled with epsom salt, lavender petals and soothing essential oils to bring a spa like experience for the lucky recipient. One tube will fill one or two baths.
This year I added FRESH lavender petals to the bath salts and the aroma is so good!
Woodsy Beard Oil
$20
Give the men in your life this wonderful, woodsy beard oil. It will be grounding and spicy and make their stubble feel soft and shiny.
Bath Fizzies
$20 for 10 Fizzies
There is nothing like sinking into a tub with a hot bubbly tub with fizzing bath bombs. If you know me well, it is my ultimate form of self-care. I have mastered the bath bomb and have found the perfect combination for a deep relaxation for the body. These smell amazing and are also so good for the skin and detoxing the body.
Custom Essential Oil Blend
$22
Do you have a special person in mind that would love a little remedy to help them sleep? Maybe manage some aches and pains? Boost immunity? Feel calm and centered? When you purchase this, you and I will chat and find the perfect blend for your loved one!
Body Butter
$25
This fan favorite is a popular gift for anyone! Handmade with natural shea butter and pure essential oils this creamy skin soothing butter is the perfect gift. Not only does this smell amazing but it is a completely natural and skin loving cream that makes the skin feel so soft.
This year I have three different varieties of body butter available!
Marigold Infused Body Butter
Marigolds are a relative to the ever popular calendula flower which is known for its skin healing properties. By infusing fractionated coconut oil with fresh marigold petals the body butter comes out silky, creamy and ultra soothing for skin. I added Wild orange, Grapefruit, Siam wood, Eucalyptus, Bergamot, Green mandarin other pure essential oils.
Geranium Infused Body Butter
Geraniums are commonly referred to as poor man’s rose, both of which are known for their skin healing properties. By infusing fractionated coconut oil with fresh geranium petals the body butter comes out smooth, creamy and so soft. To enhance the floral theme, I added pure magnolia, jasmine, and geranium essential oils.
Lavender Infused Body Butter
Lavender is known for its soothing and calming properties. By infusing fractionated coconut oil with fresh lavender blooms the body butter is perfect for a bedtime application to support sleep. Lavender is also one of the most calming plants so this is a great choice for any skin issues or simply to help dryness. To enhance the lavender, I added pure lavender essential oil.
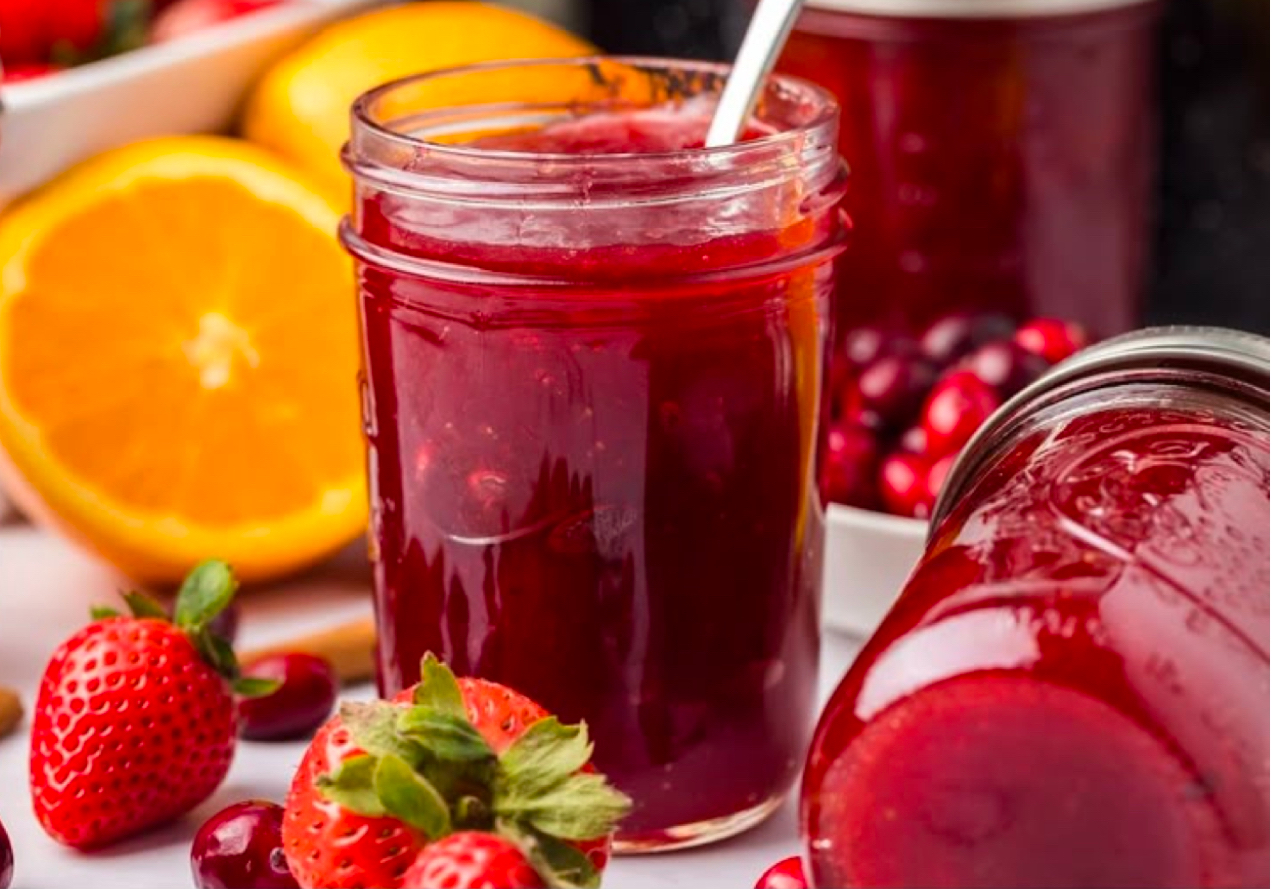
Christmas Spread
$5
Christmas Spread is a fruit spread made with cranberries, strawberries, oranges, and wonderful spices. What a bountiful flavor of the holiday season in every bite! Perfect for toast, cheesecake, Brie cheee or homemade waffles.
I also have a limited quantity of Palisade Peach Jam!
$5/jar $3/half-size jar
Potpourri Simmer Pot
$8
A potpourri simmer pot is a natural, fragrant way to freshen up your home by simmering aromatic ingredients in water on the stove. As it heats, the ingredients release their scent, creating a cozy, inviting atmosphere. These simmer pots are made of citrus peels, fresh cranberries, cinnamon sticks, cloves, and star anise.
How to Order
To simplify the process of ordering, simply email me below (or you can text me) and tell me which items you would like and if you will be picking them up, or if you’d like me to ship them. I will email you back a confirmation and a total. You can use venmo, Zelle, PayPal or good old fashioned cash.
So many of you have been so supportive of me over the years. I am so blessed that I can continue to share my passion and touch your life. It means a lot to me that you know that you are very important in my life and I am incredibly grateful that our paths have crossed. I believe that now more than ever, we need to recognize the people and meaningful connections that we all have.
As always, it is my hope that you stay healthy and happy in your mind, body and spirit.
Holding on is believing that there’s only a past; letting go is knowing that there’s a future.
The Harvest
Hello there!
I hope that you are doing well and are finding ways to bring joy into your everyday life. I am hopeful that as we move into a new season we can settle into a sense of calm and peace. The shift to fall can sometimes move us from the chaos that summer sometimes brings to a more grounded way of being.
The Autumn Equinox is a time of letting go and also harvesting the good that is abundant in our lives while also allowing the stalks and leaves to fall aside and go back to the Earth. With this beautiful and colorful season emerging it is our time to loosen our grip on the focus of growth and prepare to move into a more dormant season. This is also a great time to look at the cycles of life; seasons, months, breath, and even life.
We know that with each ending there is a beginning, in whatever shape that takes—self awareness, growth, wisdom, letting go, etc. We see this so easily in the changing of leaves–the amazing color that emerges following a season of bounty, and then the ease in which the leaf lets go. Watch as they effortlessly fall to the ground to be taken into the loving arms of Mother Earth for the new growth that waits for the next season.
I have been recently thinking that it has been such a challenging time for me since my last major hip surgery. Through that process I have changed so much. I no longer am pushing my body in the ways I once did. Rather I am enjoying the pace that my body wants to go at. I enjoy slower walks and have learned a little bit about being at ease instead of extreme activity. Sure, sometimes I miss the hard push up a mountain or the thrill of kickboxing, but through these past months of recovery I have certainly learned about letting go. And that has been a good thing.
I encourage you to go outside. Take a breath. Take time to look at letting go of what no longer serves you. Thank it for its time in your life as the teacher it is and then release it.
Finally, welcome the harvest that is within and always look for opportunities to be grateful. I know for myself, the practice of gratitude has lead me into a life of awareness that has enhanced my life everyday. Let the practice of acknowledging gratitude for all that you have become.
Life is really good, friends.
Blessings, Stacie
Essential Oils & Wellness
Many of you know that I use and rely on essential oils to maintain the health of my mind, body, and spirit. I use them throughout my home from cleaning, for pain management, energy, sleep, mood and much more. One of my favorite things is helping others get started using natural remedies and plant medicine.
You will also get an awesome welcome package from me, access to my VIP community group, education and mentoring and much more. It is easy to get started! I am also happy to chat personally with you to find the perfect options for your needs.
I offer FREE wellness consultations to talk about your goals and desire for a healthier, mind, body and spirit. Together we will create a personalized plan. Schedule yours today!
This ultra grounding blend is a fan favorite. It is all about being grounded and soaking up that forest floor aroma. The result is a calm mind and a super chill feeling. Plus, the petrified wood stones are soooooo pretty!
Cost: $22
Recipes & DIY
Did you know you can use essential oils to add flavor and health benefits to your recipes?? Fall is such a great season for warm, inviting and soul-feeding foods. Check out some of my favorites below.
I have one more batch of marigold body butter left from my summer growing and blending. Marigold’s are in the family of calendula and both support skin and inflammatory responses in the body. Plus it is luxurious. Let me know if you’d like a jar. $25
Peach Jam
Finally, I have PEACH JAM for sale. Let me know if you’d like a jar of this tasty treat. It pairs wonderfully with fresh sourdough bread, but let’s not get crazy, right? $5
Fall Diffuser Blends
I love the smell of fall and these diffuser blends which not just smell great, but your family will benefit from the healthy supports essential oils add when used aromatically.
YOGA
Online LIVE classes
Following my 30 Days of Yoga (you can find everyday on my Youtube Channel), I decided to offer at least one LIVE ONLINE class. This month I am offering a RESTORATIVE class on 9/18 at 6:30pm. You will simple need a quiet space, some pillows and this link!! The passcode is yoga.
My YouTube channel has continued to grow and you can find all kinds of videos there. Everything from chair yoga to restorative to traditional classes. Plus, you’ll find some bonus stuff, too!
This format is one of my most popular and loved! Just click on the link below and you’ll have access to the online class. Donations are appreciated. If you need samples of essential oils to fully enjoy the practice, just reach out to me.
Are you a current yoga teacher? I am also offering a yoga teacher mentoring program to help yoga teachers learn how to modify and teach to those with different abilities. Ask me more!
Life Lessons from an Autumn Leaf
We know change is coming, so we embrace its beauty for all the world to see. It’s exciting when my friends and I all begin to turn colors. I can imagine its much like when humans get their hair done or change their style of clothing. You just feel brand new, hot, beautiful–a sight to be seen, for sure. When most of us receive our new colors, and a few begin to fall, the humans come out by the droves. I’ve watched so many walking hand-in-hand. I’ve heard many intimate conversations and often witness family portraits. Children ooh and ah about the wonder of our change, and the whole world seems to take a second glance to admire our new look.
However, as the cold winds begin to blow, we know we must hold on tight to our branches until it’s our time to fall. It’s interesting because none of us want to drop. We just want to stay in our spot, high above the ground and admire the magnificent atmosphere fall brings.
1. Radiate Beauty. Autumn brings an abundance of fall colors and textures. The reds, oranges, yellows, golds and rust tones of autumn delight the senses in landscapes and rich sunsets, inspiring poets and visual artists. Take the time to radiate your own beauty and creativity to the world.
2. Connect with Your Shadow. After the long, bright sunlit days of summer, autumn brings earlier sunsets and longer shadows. It’s an ideal time for thoughtful introspection and shining the light of awareness on our own shadow parts.
3. Let Go. Trees willingly and naturally shed their leaves after putting on a radiant fall show of colors. Is there anything in your life that’s ready to be released? Enjoy the brilliance of all that has ripened and come to fruition, but be willing to let go; it will pave the way for new beginnings.
4. Save for Lean Times. Even as birds and woodland creatures are enjoying the abundance of fall, they are also storing away portions of their autumn harvest and preparing for leaner times. Enjoy the blessings of the season, but remember to plan for the future.
5. Find Balance. In a world of duality, balance is key. The autumn equinox signals equal amounts of night and day, serving as a reminder to find balance in our own lives.
Autumn is a study in contrasts, and the result is a rich, multi-sensory experience. Apply these five lessons from autumn in your own life, and drink in the bounty of this inspiring time of year.
Thank You
So many of you have been so supportive of me for over 17 years! I am so blessed that I can continue to share my passion and touch your life. It means a lot to me that you know that you are very important to me, and I am incredibly grateful that our paths have crossed. I believe that now more than ever, we need to recognize the people and meaningful connections that we all have.
As always, it is my hope that you stay healthy and happy in your mind, body and spirit.
A mother’s love is more beautiful than any fresh flower.
Mother’s Day is a great spring tradition to honor the people in your life who have nurtured and loved you. It is such a special treat to receive a handmade gift and I am thrilled to have put together a variety of my favorites things for the special mom’s in your life. These little gifts make the perfect gift to appreciate the hardworking givers in your life.
Gratitude Essential Oil Blend
$22
This perfectly crafted blend is my most popular mingling of aroma and gemstones. This wonderful scent is the perfect gift to show your thankfulness to the special momma in your life.
Siberian fir: breaking negative emotional and spiritual patterns,
Frankincense: raise awareness, shine your bright light
Grapefruit: appreciate who you are;
Wild Orange: abundance and bright future, gladness to the heart
Geranium: heart opening, realize security in what you do have
Clove: instills power, sense of protection, integrity
Amber chips; radiates laughter, vitality, and courage.
Aromatherapy Bath Salts
$7
These gorgeous tubes are the perfect end to a stressful day. The make amazing teacher gifts or special offerings for loved ones. Each tube is filled with epsom salt, lavender petals and soothing essential oils to bring a spa like experience for the lucky recipient. One tube will fill one or two baths.
Bath Fizzies
$20 for 10 Fizzies
There is nothing like sinking into a tub with a hot bubbly tub with fizzing bath bombs. If you know me well, it is my ultimate form of self-care. I have mastered the bath bomb and have found the perfect combination for a deep relaxation for the body. These smell amazing and are also so good for the skin and detoxing the body.
Glowing Face Serum
$35
This gorgeous face serum is my go to for glowing skin. This gorgeous blend includes rose hip oil, blue tansy, yarrow, rose, and geranium essential oils. I apply it in the evening after cleansing.
Body Butter
$25
This fan favorite is a popular gift for anyone! Handmade with natural shea butter and pure essential oils this creamy skin soothing butter is the perfect gift. Not only does this smell amazing but it is a completely natural and skin loving cream that makes the skin feel so soft.
Gift Certificates
Do you want to give the gift of goodness to your loved one? I have you covered! You can purchase a gift card from me and then your person and I can come up with exactly what they need! Reach out to me below to purchase!
To simplify the process of ordering, simply email me below (or you can text me) and tell me which items you would like and if you will be picking them up, or if you’d like me to ship them. I will email you back a confirmation and a total. You can venmo, Zelle, PayPal or good old fashioned cash.
So many of you have been so supportive of me during this unusual time in our lives. I am so blessed that I can continue to share my passion and touch your life. It means a lot to me that you know that you are very important to me, and I am incredibly grateful that our paths have crossed. I believe that now more than ever, we need to recognize the people and meaningful connections that we all have.
As always, it is my hope that you stay healthy and happy in your mind, body and spirit.
“Rest and self-care are so important. When you take time to replenish your spirit, it allows you to serve others from the overflow. You cannot serve from an empty vessel.” —Eleanor Brownn
Self care Mastery
Over the years I have become a master at self care and what I once thought of as purely selfish or saved for the elite has long since diminished. When I had my great “wakeup” I realized that self-care is actually a necessity to living a whole and complete life. I learned that loving myself meant taking time for certain things that bring me joy and in doing that, I am able to more effectively give to others.
Self-care doesn’t have to be weekly (and often expensive) things like massages, facials or extravagant shopping sprees. Self-care should be simple in nature and definitely doesn’t need to cost a lot. It might be that taking the time to perfectly craft your coffee in the afternoon is your version of self-care–in fact, since I am not out and about as much while I recover from hip replacement, I have found sprinkling a little ground cinnamon on my afternoon coffee to be a fabulous substitute to my usual coffee shop Americano. It may be that your self-care is gardening, or baking bread (YES!), or a solo walk, or organizing your office, or a long shower with special smelling soap, or sitting in the sunshine, or the occasional binge on Netflix.
Self Care Before Surgery:
My self-care before surgery was long, long walks everyday and vigorous strength training sessions. It was also daily coffee(s), Yoga, and weekly massages. My self-care post surgery has changed quite a bit but I am still committed to making sure that I am loving on myself every single day. When I redirect my thoughts away from pain and towards something that brings me joy, I am practicing the best kind of self care there is. I am no longer taking long, long walks or hiking in the mountains. I am not getting on the floor for Yoga, or taking long bubble baths, or splurging on multiple trips to a coffee shop throughout my day. Since I am unable to do some of those things due to limitations in mobility, driving myself and being off work for two months, I have evolved my self-care to fit my current situation.
Self Care After Surgery:
Long hot showers instead of bubble baths
Daily affirmations (I have used affirmations for years, but being a bit more intentional about them)
Making anything and everything sourdough (who knew how fun that could be?)
Dabbling more in aromatherapy when I feel my mood changing to a negative one
Using and enjoying my crystals in a deliberate way
Jigsaw puzzles, digital planning and a lot of iPad goodness
I have come to realize that self-care is a constantly evolving practice. I know for me that being productive and using my creative nature to accomplish something everyday brings me joy. That something might be baking a gorgeous loaf of sourdough, or completing a challenging jigsaw puzzle, working on a new project, or finishing a juicy novel. Or, it might be whipping up a body butter for my skin or enjoying an extra long shower. Whatever it is, I am still loving on me and that is a must for all of us.
How do you self-care and how has it evolved in your changing seasons?
Stacie believes that it is her life purpose to share the gift of Yoga with anyone who is willing to say yes. In addition to raising a family and being an advocate for those with disabilities, Stacie is founder of Embracing Spirit Yoga which specializes in bringing adaptive Yoga into community centers and rehabilitation clinics. Bringing her depth of compassion to the mat–or the chair–she offers students the opportunity to grow as an individual in all aspects of their life.With over sixteen years experience, Stacie Wyatt is an experienced 500 hour Registered Yoga Teacher with Yoga Alliance, Certified Brain Injury Specialist, Certified Trauma Informed Coach, Life Wellness Coach, Senior YogaFit Instructor, Mind/Body Personal trainer, Stress Reduction and Meditation Instructor, Pilates Instructor, and Barre Instructor.
Giving a gift from a small business is giving a gift twice. – Anonymous
It is such a special treat to receive a handmade gift and I am thrilled to have put together a variety of my favorites things to make and use. I cannot wait for your loved ones to get some of these unique items.
Gratitude Essential Oil Blend
$22
This perfectly crafted blend is my most popular mingling of aroma and gemstones. This wonderful scent will instantly shift your mood towards a place of abundance and gratitude. Apply to the wrists, behind the ears and on the heart.
Siberian fir helps in breaking negative emotional and spiritual patterns
Frankincense raises awareness and helps to shine your bright light
Grapefruit teaches us to appreciate who we are
Wild Orange brings abundance, a bright future and gladness to the heart
Geranium is heart opening and helps one to feel security in what you do have
Clove instills personal power and a sense of protection and integrity
Amber chips are a fossilized tree resin. Amber radiates laughter, vitality, and courage. This stone holds the protective energy of our beloved trees, the guardians of Earth. Amber helps to alleviate stress. Amber clears depression, stimulates the intellect and promotes self-confidence and creative self-expression. It encourages decision-making, spontaneity and brings wisdom, balance and patience.
Aromatherapy Bath Salts
$8
These gorgeous tubes make great stocking stuffers, teacher gifts or special offerings for loved ones. Each tube is filled with epsom salt, lavender petals and soothing essential oils to bring a spa like experience for the lucky recipient. One tube will fill one or two baths.
Woodsy Beard Oil
$20
Give the men in your life this wonderful, woodsy beard oil. It will be grounding and spicy and make their stubble feel soft and shiny.
Bath Fizzies
$20 for 10 Fizzies
There is nothing like sinking into a tub with a hot bubbly tub with fizzing bath bombs. If you know me well, it is my ultimate form of self-care. I have mastered the bath bomb and have found the perfect combination for a deep relaxation for the body. These smell amazing and are also so good for the skin and detoxing the body.
Custom Essential Oil Blend
$22
Do you have a special person in mind that would love a little remedy to help them sleep? Maybe manage some aches and pains? Boost immunity? Feel calm and centered? When you purchase this, you and I will chat and find the perfect blend for your loved one!
Body Butter
$25
This fan favorite is a popular gift for anyone! Handmade with natural shea butter and pure essential oils this creamy skin soothing butter is the perfect gift. Not only does this smell amazing but it is a completely natural and skin loving cream that makes the skin feel so soft.
How to Order
To simplify the process of ordering, simply email me below (or you can text me) and tell me which items you would like and if you will be picking them up, or if you’d like me to ship them. I will email you back a confirmation and a total. You can venmo, Zelle, PayPal or good old fashioned cash.
So many of you have been so supportive of me during this unusual time in our lives. I am so blessed that I can continue to share my passion and touch your life. It means a lot to me that you know that you are very important to me, and I am incredibly grateful that our paths have crossed. I believe that now more than ever, we need to recognize the people and meaningful connections that we all have.
As always, it is my hope that you stay healthy and happy in your mind, body and spirit.
My garden is bursting with some really good size acorn squash this year and one of my favorite ways to prepare it is simply roasted. This easy Roasted Acorn Squash recipe is a flavorful, colorful, and nutritious side that goes with everything! You’ll love how easy it is to make this! Acorn squash is not just super flavorful but it is also packed with nutrition.
Health Benefits of Acorn Squash:
Acorn squash is high in antioxidants that help fight free radical damage. They contain carotenoids, beta-carotene, Vitamin C, potassium, manganese, thiamine, magnesium, Vitamin B6 and other key nutrients. Acorn squash is in usually available year-round, with peak season from early October to December. A ripe Acorn Squash will feel heavy for its size and has smooth, dull skin, and no soft spots. Look for one that has a good mix between green and orange coloring.
The Ingredients
This easy, basic recipe is essentially just acorn squash, butter, and seasonings! You’ll love how simple it is to pull together roasted acorn squash on the fly.
Squash: Cut one squash in half lengthwise, and scoop out the seeds.
Butter: Melt the butter, or substitute your favorite oil.
Oregano and Thyme: Driedoregano and thyme are perfect with the natural sweetness of squash.
Garlic Powder: Garlic powder is an easy way to add intensity of flavor to this dish.
Paprika: Made from dried ground peppers, paprika is earthy and mild (not spicy!) and lends a beautiful color to the squash as it roasts.
Salt and Pepper: To taste.
Fresh Parsley: Chopped fresh parsley is an appetizing optional garnish.
How to Make Roasted Acorn Squash the Easy Way
Preheat the Oven and Cut the Squash. Before you start, make sure topreheat the oven to 400°F. Next, cut the acorn squash in half, lengthwise, stem end to pointed end. (For the easiest way to cut through squash rind see the “Tips” section below.) Then slice each squash half into ½ inch-thick slices.
Season the Squash. Arrange the squash slices on a baking sheet. Make the seasoned butter mixture by melting the butter and stirring in the herbs, garlic powder, paprika, salt, and pepper. Brush the squash slices with the butter mixture.
Roast. Roast the seasoned squash for 20 minutes or so, until the squash is tender.
Enjoy! Remove the baking sheet from the oven, and garnish the squash with parsley before serving warm.
My little baby acorn is growing
So, that’s it! Perfect roasted acorn squash, pretty enough for a holiday menu, but easy enough to make any time. I am so excited for my acorn squash babies to fully grow so that I can make some great dishes like this one.
With over sixteen years experience, Stacie Wyatt is a E-500 hour Registered Yoga Teacher with Yoga Alliance, Certified Brain Injury Specialist, Wellness Coach, Senior YogaFit Instructor, Mind/Body Personal trainer, Stress Reduction and Meditation Instructor, Pilates Instructor, and Barre Instructor. Stacie is also certified in Integrative Movement Therapy™and is also a believer in the power and application of essential oils for health and wellness and proudly shares doTERRA essential oils.
These amazing oils are among my absolute must haves especially as we move towards fall. I know so many of us really enjoy the smells of fall, and our home, but those toxic candles can be no good for your health. I turn to these natural and pure essential oils, to fill my space with the smells of fall, and bring a calm sense of peace to my home.
Northern Escape and Harvest Spice!!
Forget the rush of everyday life as you fill your home with the inspiring, fresh aroma of Northern Escape Woodland Blend.
Harmonious Black Spruce, Siberian Fir, Balsam Fir, Lavandin, Cedarwood, Cypress, Hinoki, Frankincense, Nootka, Cananga, and Clove essential oils create a beautiful outdoor ambiance.
It is deeply grounding to the body, mind and spirit!
High in the chemical constituent ?-Pinene, Northern Escape provides a relaxing environment. The essential oil blend also contains bornyl acetate, a natural chemical component that gives fir trees their distinctive aroma and may be a beneficial cleaning agent, according to research. Whether it’s diffused, applied topically, or used as a surface cleaner, Northern Escape is a refreshing addition to any home- smells like you stepped into a forest!! It is 10% off all month.
Celebrate the coming fall season- wonderful memories with family and friends, enjoying the rich, uplifting aroma of Harvest Spice as you do.
Freshen the air and welcome autumn with the comforting ambiance of Cassia, Clove, Eucalyptus, Cedarwood, Nutmeg, and Cinnamon Bark essential oils. This blend smells like Fall and there is no better way to ring in the new season than with this amazing blend!!! It is only available for a limited time, so make sure to get yours now!!
Grab these beautiful blends and my favorite diffuser HERE! Once you get started with essential oils, I will provide you with education and mentoring to help you effectively use what you purchase. You can also check out this gorgeous, free digital guide to learn more.
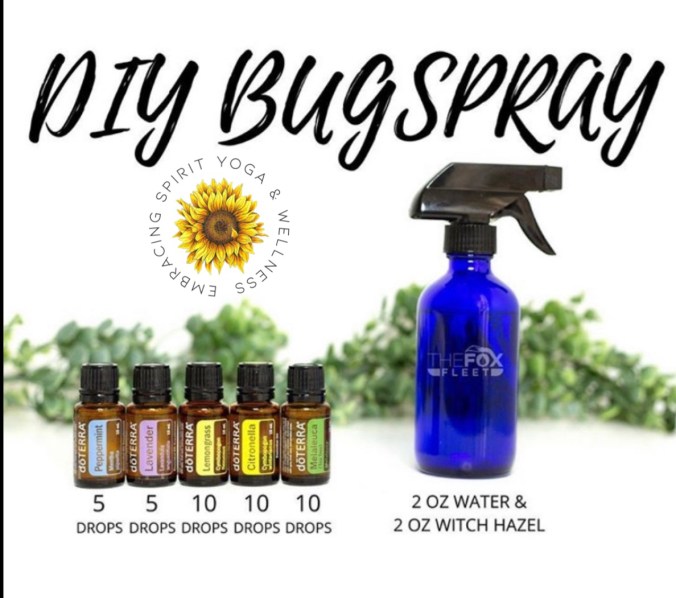
Between the heat of summer and the humidity of rain, bug season is here. This simple and affordable option is safe for the whole family and doesn’t contain that nasty you know what (starts with a D and sounds like feet) that is harmful.
You can grab these oils here and shop in my amazon shop for my favorite glass bottles. I also love cedarwood for extra bug control!
When you buy these I will also send you a great package with resources and lots of extras. Plus, you’ll get a free wellness consult and access to mentoring and education. These oils also are great for aches and pains, tension, skin and mood support and much more. The investment is totally worth it!
Summer time means frozen treats are hanging around far more often. I am not a huge fan of store-bought ice creams or other frozen treats, but I do love the occasional cool down summer treat on hot days. By using natural ingredients, fruit and essential oils I am getting a little health kick while nurturing that summer sweet tooth.
Here are a few of my favorite popsicle recipes. Be sure if you do choose to add essential oils to your popsicles you are using pure essential oils otherwise you may be adding things to your body that would not be healthy. You can find the brand that I trust the most in the highlighted links for oils in each recipes. You can also find out how to use essential oils safely in this free digital brochure.
If you choose to add essential oils to the popsicles, make sure that they are pure and safe for internal use.You can get these essential oils at wholesale pricing with 25% off!
How to Make Popsicles
Place all ingredients in the blender and blend until well combined
Pour mixture into popsicle molds and freeze for 4-6 hours.