Lemon & Strawberry Oat Bars

Lemon & Strawberry Oat Bars
Welcoming spring one sweet bite at a time.

There’s something so simple and sacred about baking with seasonal ingredients—especially when they bring brightness and joy into your kitchen. These Lemon & Strawberry Oat Bars are the kind of recipe that feels like a love letter to spring. They’re soft, golden, just the right amount of sweet, and filled with the zing of lemon and the goodness of strawberries.

Baking can be such a grounding, heart-opening ritual. As you stir and pour, layer and bake, you’re not just making food—you’re creating nourishment, comfort, and care. Whether you share them with loved ones or savor them solo with a warm cup of tea, I hope these bring a little sunshine into your day.

Spring calls for something sweet, light, and bursting with brightness. These Lemon & Strawberry Oat Bars are like sunshine you can taste—easy to make, naturally sweetened, and the perfect blend of tangy and comforting.

Made with fresh strawberries, zesty lemon, and wholesome oats, this treat is perfect for an afternoon snack, picnic, or simple celebration of the season. They’re gluten-free and can be made vegan with a few swaps.


Ingredients

For the base and topping:

  • 1 ½ cups rolled oats
  • 1 cup almond flour (or oat flour)
  • ? cup coconut sugar or brown sugar
  • ½ tsp baking soda
  • ¼ tsp sea salt
  • Zest of 1 lemon
  • ? cup coconut oil or melted butter
  • 1 tsp vanilla extract
  • 2 tbsp maple syrup

For the strawberry filling:

  • 1 ½ cups chopped fresh strawberries
  • Juice of 1 lemon
  • 1 tbsp maple syrup
  • 1 tbsp chia seeds (to thicken)

Instructions

  1. Preheat your oven to 350°F (175°C) and line an 8×8 baking dish with parchment paper.
  2. Make the filling: In a small saucepan, combine strawberries, lemon juice, and maple syrup. Cook over medium heat until the berries break down and get jammy (about 8–10 minutes). Stir in chia seeds and set aside to cool and thicken.
  3. Make the base/topping: In a large bowl, mix oats, almond flour, sugar, baking soda, salt, and lemon zest. Stir in coconut oil, vanilla, and maple syrup until the mixture is crumbly but holds together when pressed.
  4. Press about ? of the oat mixture into the bottom of the pan. Spread the strawberry filling evenly over the top. Sprinkle the remaining oat mixture over the strawberries and gently press it down.
  5. Bake for 25–28 minutes or until the top is golden. Let cool completely before slicing into bars.

? A Few Tips

  • You can use frozen strawberries—just thaw first and drain any excess liquid.
  • For a vegan version, use coconut oil or vegan butter.
  • These bars store well in the fridge for up to 5 days (if they last that long!).

Mindful Moment:

While the bars bake, take a moment to sit with a cup of tea and breathe in the aroma filling your kitchen. Gratitude lives in these quiet, simple rituals—the scent of lemon zest on your fingers, the sweetness of strawberries, the warmth of the oven.

Let this be a small celebration of the season and your own sweetness.

If you love my content and want more tools for mindfulness & movement, check out my digital products on Buy Me a Coffee! Your support helps me continue creating.

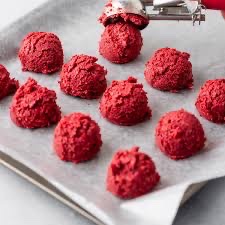
Red Velvet Cake Balls

While I love a good ol’ classic cake I decided to try my hand at making red velvet cake into bite-sized treats for Valentines Day! An added punch of Wild Orange essential oil gives these an extra decadent flavor. If you have never added essential oils to food you’re missing out! Check out this free ebook download that explains many ways to use essential oils, including in food! Be sure to always check that your oils are tested for purity, though!

Okay, back to decadent chocolate goodness! These are so pretty and taste amazing!

How to Make Red Velvet Cake Balls

This tasty creation is made out of red velvet cake that is bonded together with homemade cream cheese frosting and coated in white chocolate. For an extra decadent finish, white chocolate and dusted the top with sprinkles for a stunning polish.

Make sure to add sprinkles before the chocolate dries to ensure that they firmly stick. We chose red and white for a color theme, but you could use sprinkles and sanding sugars in any array of colors to match a party theme, team uniforms, or holiday.

Ingredients

  • 1 (15.25-oz.) pkg. red velvet cake mix
  • 1 cup whole milk
  • ? cup (2 2/3 oz.) salted butter, melted
  • 3 teaspoons vanilla extract, divided
  • Nonstick spray
  • 1 (8-oz.) pkg. cream cheese, softened
  • ½ cup (4 oz.) salted butter, softened
  • 4 cups (about 16 oz.) powdered sugar
  • 3 (10-oz.) pkg. white chocolate chips
  • 2 drops wild orange essential oil
  • Red and white sprinkles and sanding sugars

Directions

  1. Preheat oven to 350°F. Beat cake mix, milk, melted butter, and 1 teaspoon of the vanilla in bowl of a heavy-duty stand mixer fitted with paddle attachment on low speed until well blended, about 1 minute. Increase speed to medium, and beat 2 minutes. Pour batter into 13- x 9-inch baking pan that has been sprayed.
  2. Bake in preheated oven until a wooden pick inserted in center comes out clean, 24 to 28 minutes. Cool in pan on a wire rack 15 minutes. Turn cake out onto wire rack, and let cool completely, about 2 hours.
  3. Meanwhile, beat cream cheese and softened butter with heavy-duty stand mixer fitted paddle attachment on medium speed until creamy. Reduce speed to low, and gradually add powdered sugar and remaining 2 teaspoons vanilla, beating until blended. Increase speed to medium-high, and beat until fluffy, 1 to 2 minutes.
  4. Crumble cooled cake into a large bowl. Stir in 2 cups of cream cheese frosting. (Reserve any remaining frosting for another use.) Roll cake mixture into 48 balls, about 1-inch in diameter. Place balls on baking sheets, and cover with plastic wrap. Chill 8 hours or overnight.
  5. Melt 1 package of the white chocolate chips in a medium-size microwavable bowl in microwave according to package directions. Stir in two drops of wild orange essential oil. Start with 16 cake balls (continue to chill remaining 32 cake balls). Using a fork and working with 1 cake ball at a time, dip ball into melted wafers, allowing excess to drip back into bowl. Place ball on a parchment paper-lined baking sheet, and immediately sprinkle with desired amount of sprinkles or sanding sugars. Repeat with remaining 15 cake balls and melted wafers in bowl, cleaning fork between each dip. Wipe bowl clean, and repeat 2 more times with remaining chilled cake balls and 2 packages of melting wafers, and desired amount of sprinkles. Chill until ready to serve.

Follow me for more goodness!